Friday, August 24, 2012

Decadence ... In a burger

I have had three remarkable experiences involving burgers in the past month. Each of them evoked a When Harry Met Sally type of reaction in me.  Fortunately, in each instance, I was surrounded by people who understood and had their own--how shall I put this?--enthusiastic responses to their food.

But I really didn't want to write about burgers. Honestly, it seems like every food magazine and foodie email I've seen this summer features burgers.  Don't we all know how to make burgers? 

So after my first orgasmic burger experience, at the fabulous Hubert Keller's Burger Bar in Las Vegas,  I waited. The burger: the Hubert Keller Burger, with buffalo meat, caramelized onions, baby spinach, bleu cheese, and a red wine & shallot sauce. OMG.

Then, this past Saturday, I went to a favorite Milwaukee-area restaurant, Cafe Hollander in Wauwatosa. I've had many wonderful things from their menu in the past--the Farmer's Market Omelet, the pulled pork sandwich, several great salads--but this time, my first time having dinner at the restaurant, it was the Bleu-cy Burger that caught my eye. It's a half-pound burger stuffed with cambazola cheese (a cross between camembert and Gorgonzola) and topped with bleu cheese, bacon, and their homemade Tandem Dubbel barbecue sauce.  We couldn't decide which was more decadent--my burger or my son's goat cheese Mac & cheese.  Wow.

But it was dinner Sunday night that put me over the edge and prompted me to write. Despite having our burgers at Cafe Hollander just the night before, my husband & I still had burgers on the brain and consented to our sons' request for burgers at home. Being a big fan of steak au poivre and all its peppery goodness, I decided to make burgers au poivre. 

I had made an improvised version of an au poivre sauce before--not totally authentic, but quite satisfying nevertheless. The hardest part is just finding the demiglace in the store in the first place. Making it involves hours of work including roasting veal bones, simmering them forever to make stock, and then reducing that sauce to demiglace.  I find it in small, shelf-stable containers sporadically at random specialty food stores and stock up as much as the expiration dates allow. Today I had one left, and it would be used for a very worthy cause. And this time I was going to add shallots, my current favorite ingredient.

Since the boys don't generally care for an abundance of pepper, I decided to stick with cheeseburgers for them but let them choose which cheese they wanted. My 12-year-old opted for cojack, while my 7-year-old budding gourmand chose a goat Gouda. He's a huge fan of goat cheese--go figure! I put bleu cheese on mine, and my husband went for white cheddar.

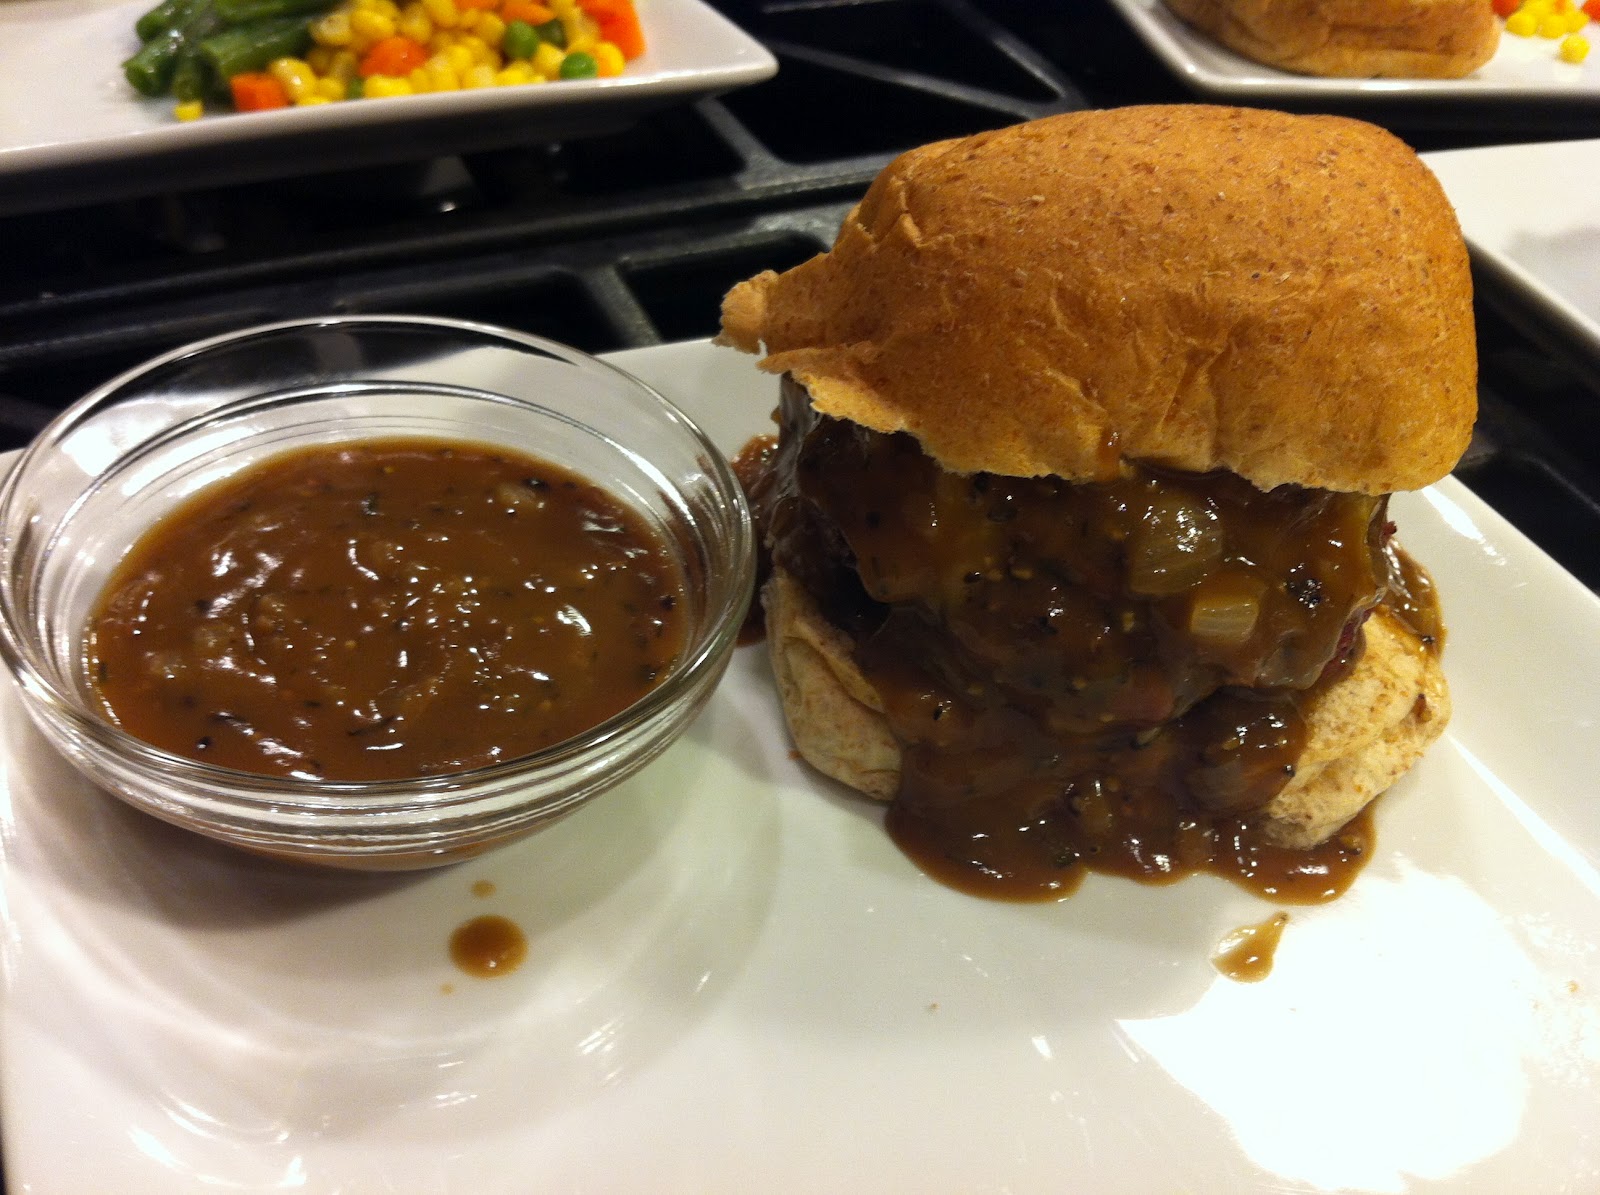
The au poivre sauce came together beautifully. It was one of those moments where I could tell before tasting it that it was going to be good. My husband, who was already starving, threatened to stand at the stove and just eat the sauce with a spoon if the burgers weren't done soon.

We slathered the grownups' burgers with the sauce and put some into small bowls for dipping our fries. These burgers ranked right up there with the Burger Bar and Cafe Hollander, and were all the better because we can make them whenever we want.

Burgers Au Poivre

The burgers:
1 lb lean ground beef (preferably grass-fed organic)
1/4 onion, minced
1 tsp malt vinegar
Salt (to taste)
2 tbsp cracked black peppercorns

Combine all ingredients except peppercorns in a bowl and mix well with your hands.  Form into patties. Coat both sides with cracked peppercorns. Grill to preferred level of doneness.

Au Poivre sauce:
1 pkg demiglace (1.5 oz)
1 cup beef stock (or broth, in a pinch)
2 tbsp butter (unsalted)
2 tbsp flour
2 shallots, minced
1-2 tbsp cracked black peppercorns
1 tsp dried thyme
1/4 cup red wine
Salt (to taste)

Place beef stock in a saucepan and heat to a slow simmer.  Add demiglace and stir until dissolved.  Set aside and keep warm.

Melt butter in another saucepan.  Add shallots and sauté on medium heat until translucent (do not brown).  Sprinkle flour over the shallot mixture and stir until well combined.  Cook the mixture--your roux--until it turns blond, stirring regularly to prevent burning.  Add thyme and stir until combined.

Pour the stock/demiglace mixture over the roux and whisk vigorously to integrate without creating lumps.  Allow the sauce to simmer slowly, stirring occasionally, for about 5-10 minutes.  Taste and add salt if needed, taking care not to over salt because the sauce will become more concentrated in flavor as it cooks.

Stir peppercorns and wine into the mixture and simmer another 5 minutes until fully integrated.  Taste and adjust seasonings as needed.  Pour over pepper-encrusted burgers or steaks.


Thursday, August 9, 2012

Mise en place

“Mise en place” is a cooking term defined at the beginning of every Culinary Institute boot camp I’ve attended and occasionally thrown out during cooking shows on TV. Literally, it translates from French to English as “setting up.” I’ve heard others describe it as “everything in its place,” which is how I usually think of it. According to Chef Remolina, as well as several other chefs at the CIA, it refers to having all of your ingredients at the ready, including chopped and measured as appropriate. Chef also stressed that this includes being mentally prepared—having reviewed the recipes and understanding what needs to happen when before you actually dive into preparation. In practice, the recipe doesn’t necessarily turn out as planned every time, but if you’re prepared you’re better able to adapt and make things work in the end.


After I attended my first boot camp at the CIA with a good friend, she gave me a lovely silver bracelet with “mise en place” engraved on it. It’s much more than a reminder for my love of food and the wonderful experience I had at that first boot camp. Instead, it has become a bit of a life mantra for me. People who know me well will tell you that I’m not the most organized person on the planet. I can even hear them chuckling as they read that last sentence, knowing it’s the understatement of the year. But it’s certainly aspirational for me, a reminder to think things through, prepare myself physically and mentally for what’s ahead of me.


A professional kitchen is a place of organized chaos, with a tilt toward the “chaos” part of that phrase when it’s boot campers in the kitchen. So is my life. Yours too? Yeah, I hoped I wasn’t the only one. It helps to have the occasional reminder to put things in their place, think things through, and be prepared as you can for whatever happens. I’m not there yet, but I keep looking at my wrist to remind myself to step back, think it through, and keep trying.

Wednesday, July 25, 2012

Farm Share Ratatouille

This year is our first participating in a community-supported agriculture program. The deal is, we pay a local organic farmer a fee in the winter, and they use the funds to buy seeds and run the farm. Once plants start cranking out the produce in the spring and summer, we pick up a box full of our share of the items picked for that week.  We don't know what will be in the box until we get an email the day before our pickup.

So far there have been a few items in our boxes that have mystified me as to how to use them. Fortunately I have some foodie friends I reach out to for advice, and then there's also Google. Kale and kohlrabi were both foreign entities to me prior to this program--I may have been able to identify them on sight, but that's about it.

The kale ended up torn into potato-chip-sized pieces, tossed with olive oil, salt & pepper, and spread on a sheet pan to bake in the oven until crispy. These kale chips were initially recommended to me by my food friend Iris, who is, incidentally, a bit of a free spirit who lives in the Bahamas and cooks on private charter boats in the Caribbean. Iris also helped me with several suggestions for kohlrabi, including braising the greens and using the root cooked and mashed with potatoes, turnips, or whatever.  Iris rocks.  But I digress.

The biggest challenge with the box of produce each week is preparing, storing and using it before it goes bad. Such was the situation last night when, the night before I had to leave for a 4-day business trip, I found myself with a fridge overflowing with produce, with much of it likely to go bad before I returned. Oy. My biggest concerns were the Roma tomatoes that we're still waiting to be roasted, the Asian eggplant we'd gotten the week before, and a bag full of small Brussels sprouts. In addition, we'd just received zucchini and basil in our box for the week.

The solution: a vegetarian hodge podge of ratatouille with a side of caramelized Brussels sprouts.

If you've seen the Pixar movie, you may know that ratatouille is a French peasant dish.  I can't see or hear the name without thinking 'rat patootie.' I had made it once before, attempting to follow the style of the dish as it was in the movie--the rat turned this rustic mixture of diced and stewed vegetables into an elegant dish of thinly sliced and stacked vegetables that wowed the skeptical critic who had come to experience the restaurant. That movie version, by the way, was designed by the famous chef Thomas Keller of the French Laundry in the Napa Valley. My attempt was mediocre and did not win over my family.

This time I was using the recipe from my French Cuisine Boot Camp at the Culinary Institute of America.  While I hadn't made the dish myself, I had seen some of the preparation and tasted the final product and thought it was wonderful.

The danger: the recipe is chock full of zucchini and eggplant, which I needed to use up but which are not high on the list of food favorites in my family. In fact, it was highly likely that I would be the only one eating it.

The ratatouille was remarkably simple to prepare: dice the ingredients, sauté them in order, then let them simmer. It smelled delicious. While the ratatouille simmered, I trimmed the Brussels sprouts, cut the larger ones in half, then steamed them until they were mostly cooked. Meanwhile, I melted some bacon fat in a pan (when I don't have any leftover bacon fat on hand, I just cook 2-3 strips of bacon) and tossed in a diced onion to sauté. Once the onions are translucent, toss in the Brussels sprouts and allow them to stay put and brown well on one side. Then toss them so the other side can cook. Once they're well browned, put salt and pepper on them and you're good to go.

The verdict? Everyone devoured the Brussels sprouts in short order. Yes, I am blessed to have two kids who actually like Brussels sprouts, and this is their favorite preparation. The ratatouille was a hit with me and my husband, my older son picked out the zucchini and enjoyed the rest, and my youngest ... Well, let's just say he liked the movie better.

Ratatouille
1 tsp olive oil
2/3 cup red onion, diced
1-1/2 tbs garlic, minced
1 tbs shallots, minced
1 tbs tomato paste
5 plum tomatoes, seeded, sliced 1/4" thick
1 cup diced zucchini
1 cup diced red bell pepper
1-1/2 cups eggplant, diced
1 cup yellow squash, diced
1 cup vegetable stock
Basil, chiffonade, to taste
Dried oregano, to taste
Salt and pepper, to taste

Heat oil in a medium saucepot over medium-high heat. Add onions, garlic, and shallots and sauté until the onions are translucent, about 5-7 minutes.

Add the tomato paste and sauté until it becomes brown, about 3-4 minutes.

Add the tomatoes, zucchini, bell pepper, eggplant, yellow squash and stock. Bring to a gentle simmer and stew, stirring occasionally, until the vegetables are tender, about 15 minutes.

Season with the basil, oregano, salt & pepper.

Monday, May 16, 2011

Embracing color on your plate: purple rice!

You probably know that serving a range of color in our foods is more appealing to the eye and therefore makes the food more appetizing. More recently, scientists are telling us that the natural, bright colors of foods contain anthocyanins that our bodies need, and serving a combination of colors can be quite good for us.

But have you ever tried colored rice?

Personally, I’m a big believer in the idea that kids are more likely to try and like new foods if you keep them interesting and fun, and that includes using color. No, green eggs and ham don’t count: too monochromatic, and totally artificial. Sorry, Dr. Seuss.

So in the warm summer months, I raid the farmer’s market for purple potatoes, red carrots, multi-colored bell peppers—anything to capture the colors of summer and put them on the plate. But since these options are most readily available only in a short period of time, colored rices offer a nice year-round source of healthy color on the plate.

One of our favorite restaurants in town, Koreana, serves a dish called bi bim bahb which consists of several different stir-fried vegetables over rice, with purple rice as one option. Kim, one of the sisters who owns and runs Koreana, explained to me that the purple rice is actually black rice cooked with brown and/or white rice. The color from the black rice bleeds into the cooking water and turns everything purple. In digging further, I learned that the black rice is a whole-grain rice and contains similar health benefits to brown rice.

This led me to search for and experiment with different colored rices. I had to look beyond our local grocery store to find these unusual varieties, but at Whole Foods and at Sendik’s in Whitefish Bay (WI) I was able to find black rice under the name “Forbidden Rice” as well as packages of mixed black and white rices that were marketed as “purple rice” and a different variety altogether marketed as “red rice.”

These rices require slightly different techniques for cooking from one to the next. In general I prefer cooking my rice using the pasta method (boiling it in a large quantity of water and then draining it) as opposed to the pilaf method (cooking the rice in a precise amount of water and stopping when all of the water is absorbed). I have been told repeatedly that the pilaf method is the “proper” method, but I have had much more consistent results using the pasta method and am not about to change anytime soon.

In using the premixed packages of black/white and red/white rices, I heat a 2qt. pot of water to a boil, reduce the heat, then stir in about 1 tsp. of salt. Next, add the amount of rice you want to make, increase the heat until the water returns to a simmer, and cook until the rice is al dente or slightly firm when you bite into it. This usually takes 10-15 minutes, so start testing it at 10 minutes so it doesn’t become a pot of purple mush. Drain the water and let the rice rest on the stove, lid on, until you are ready to serve.

With the “straight” black rice (the Forbidden Rice), I start with the same 2 qt. pot of boiling water and add the 1 tsp. of salt. Then I add black rice to comprise about 2/3 of the total amount of rice I want to cook. Let the black rice simmer for about five minutes, then add basmati or jasmine rice to make up the remaining 1/3 of the total rice. Allow the combined rices to simmer, and start checking it for doneness after seven minutes.

Here are links to both of the rice brands I have tried for black/purple and red rice. I have not purchased from these websites and therefore do not endorse them, but you can see what the package looks like and generally what pricing would be for these items.
Forbidden Rice from Lotus Foods:
Alter Eco Purple Rice and Ruby Red Rice: You probably know that serving a range of color in our foods is more appealing to the eye and therefore makes the food more appetizing. More recently, scientists are telling us that the natural, bright colors of foods contain anthocyanins that our bodies need, and serving a combination of colors can be quite good for us.

But have you ever tried colored rice?

Personally, I’m a big believer in the idea that kids are more likely to try and like new foods if you keep them interesting and fun, and that includes using color. No, green eggs and ham don’t count: too monochromatic, and totally artificial. Sorry, Dr. Seuss.

So in the warm summer months, I raid the farmer’s market for purple potatoes, red carrots, multi-colored bell peppers—anything to capture the colors of summer and put them on the plate. But since these options are most readily available only in a short period of time, colored rices offer a nice year-round source of healthy color on the plate.

One of our favorite restaurants in town, Koreana (www.thekoreana.com), serves a dish called bi bim bahb which consists of several different stir-fried vegetables over rice, with purple rice as one option. Kim, one of the sisters who owns and runs Koreana, explained to me that the purple rice is actually black rice cooked with brown and/or white rice. The color from the black rice bleeds into the cooking water and turns everything purple. In digging further, I learned that the black rice is a whole-grain rice and contains similar health benefits to brown rice.

This led me to search for and experiment with different colored rices. I had to look beyond our local grocery store to find these unusual varieties, but at Whole Foods and at Sendik’s in Whitefish Bay (WI) I was able to find black rice under the name “Forbidden Rice” as well as packages of mixed black and white rices that were marketed as “purple rice” and a different variety altogether marketed as “red rice.”

These rices require slightly different techniques for cooking from one to the next. In general I prefer cooking my rice using the pasta method (boiling it in a large quantity of water and then draining it) as opposed to the pilaf method (cooking the rice in a precise amount of water and stopping when all of the water is absorbed). I have been told repeatedly that the pilaf method is the “proper” method, but I have had much more consistent results using the pasta method and am not about to change anytime soon.

In using the premixed packages of black/white and red/white rices, I heat a 2qt. pot of water to a boil, reduce the heat, then stir in about 1 tsp. of salt. Next, add the amount of rice you want to make, increase the heat until the water returns to a simmer, and cook until the rice is al dente or slightly firm when you bite into it. This usually takes 10-15 minutes, so start testing it at 10 minutes so it doesn’t become a pot of purple mush. Drain the water and let the rice rest on the stove, lid on, until you are ready to serve.

With the “straight” black rice (the Forbidden Rice), I start with the same 2 qt. pot of boiling water and add the 1 tsp. of salt. Then I add black rice to comprise about 2/3 of the total amount of rice I want to cook. Let the black rice simmer for about five minutes, then add basmati or jasmine rice to make up the remaining 1/3 of the total rice. Allow the combined rices to simmer, and start checking it for doneness after seven minutes.

Here are links to both of the rice brands I have tried for black/purple and red rice. I have not purchased from these websites and therefore do not endorse them, but you can see what the package looks like and generally what pricing would be for these items.

Forbidden Rice from Lotus Foods: http://www.lotusfoods.com/Forbidden-Rice/p/LOT-00210&c=LotusFoods@All

Alter Eco Purple Rice and Ruby Red Rice: http://www.worldpantry.com/cgi-bin/ncommerce3/CategoryDisplay?cgmenbr=688899&cgrfnbr=773890

Monday, March 7, 2011

The Sharpest Knife in the Drawer

Last summer I received a phone call from a young man who said my neighbor gave him my number. A red warning light started flashing in my brain—the last time I received a call like this I ended up enduring a 2-hour vacuum cleaner demonstration. It was not a pleasant experience.

This time the caller said he was heading off to college soon and needed to complete a few more demonstrations of Cutco knives so he could gain credit toward earning a scholarship. Between the “Can you help me out?” plea and the fact that he was demonstrating knives, I couldn’t turn him down.

Unlike the vacuum cleaner sales call, I was really excited at the prospect of this visit. I had a handful of Cutco steak knives that I had received as a gift many years ago, and although they were used quite infrequently, I always liked them. And chopping things is, in my mind, one of the most relaxing and therapeutic parts of cooking. Seriously.

I welcomed the young man into my home a few days later. I listened patiently as he went through his education process on how knives are made, what to look for, what are some of the drawbacks of cheap knives—things I had learned through previous cooking classes, a knife skills class, and trial & error, but that perhaps many people didn’t know. But despite the sales pitch and the interesting demonstrations, these knives with their ridged blades and angular, ergonomically correct handles didn’t take my breath away like my sleek, scary-sharp Wusthof knives.

This was not purely a style-over-substance debate. My Wusthof knives fared quite well in the comparative Cutco tests the salesman performed in my kitchen. The salesman seemed surprised that my knives were sharp and well honed, something I think many people neglect to do just because they don’t know how to do it.

The most significant issues I had against these knives were that 1) I can’t get my head around using a serrated knife for most of my cutting, and 2) there were just so many different knives for specialized purposes that seemed unnecessary. Which leads to this question:

What knives does one really need?

There is an important distinction between “need” and “want.” I recognize that. I have many knives in my drawer, and I love them all (or at least most of them). But when push comes to shove, just three knives can get you through most all of your kitchen adventures: a chef’s knife, a paring knife, and a serrated knife. Some people will tell you that you should also have a flexible boning knife, but I have found that I can do pretty much any task with these three.

The chef’s knife serves most chopping purposes. It has the broadest range of uses and is my go-to knife for nearly everything. The traditional chef’s knife has a smooth, curved blade that is well suited to the rocking motion used when you slice and dice. The trendy new variation on this, the Santoku knife, has a flat blade with dimples on the side designed to reduce friction as you slice through food. Either the traditional chef’s knife or the Santoku function quite well as your all-purpose knife. Whether you choose a 6- or 8-inch blade is purely a matter of preference based on what feels right in your hand.

The paring knife, the short stubby knife in your drawer, handles the finer knife work thanks to its shorter blade and easy fit in your palm. It can be used in place of a vegetable peeler when needed and is also good at trimming mushrooms or cutting other small items.

The serrated blade is best for tearing through tougher surfaces—bread crust, cooked meats, or a tomato skin. I have a bread knife that I often use for slicing pork tenderloin or other meats just because it does the job so well. I’m sure that’s not what they teach at the Culinary Institute, but maybe I’d get points for resourcefulness.

Beyond these three knives, you can expand your collection in many different directions. I have multiples of some types of knives that I use a lot so that I can have one of my marathon weekend cooking sessions and always have a clean knife available to me. So I have both a chef’s knife and a Santoku knife, as well as two paring knives. You can also get more specialized knives, which is where the expansive selections of Cutco knives (or, for that matter, any large knife set) come into play. Some of these special players include a boning knife if you debone a lot of chickens or filet a lot of fish; a grapefruit knife if that’s your thing; a carving knife; or kitchen shears (another favorite of mine).

So even if you have decided what knives you need, do you need to pitch the knives in your drawer & start over?

Not necessarily.

I firmly believe that an investment in a few quality tools in the kitchen makes cooking a more enjoyable experience and results in fewer mistakes in the end. My own set of knives is much like the entirety of my house: a combination of things that were given to me, handed down, and items we bought ourselves. My beautiful family of knives represents a blend of Wusthof (my favorites), Chicago Cutlery (from my wedding registry) and a lone CIA knife (that’s Culinary Institute of America, not the other CIA) that I received as part of a cooking boot camp class.

So, take a look at what you have today, what you need, and replace or fill any gaps as needed. Here are my suggestions:
1. If you’re buying a new knife, invest in quality. Look for knives where the metal extends from the tip of the knife all the way through the handle. Avoid wooden handles which can warp and collect germs. You don’t have to spend a fortune on a knife, but if you’re eyeing a new chef’s knife and it only costs $20, you might want to set your sights a little higher.
2. Hone your knives regularly with a sharpening steel. That’s the tool that looks like a metal dowel with a handle. It serves to align the teeth of the blade so that it remains sharp. A sharp knife is actually a lot safer than a dull knife because it’s less likely to slip off of whatever you’re cutting and into your finger.
3. Sharpen your knives every few years. Honing keeps the knife in good shape, but every few years you need to take a more dramatic step and actually get them sharpened, which actually removes some of the metal in order to create a new edge. This can be done by a professional (our grocery store actually offers this service every year around Thanksgiving), or you can try a sharpening device.
4. Wash your knives by hand to avoid damaging the blade. If the knife blade bangs against other silverware in the dishwasher it can put dings in the blade, or the tip can snap off. In all honesty, I put mine in the dishwasher but I make sure the knife is the only thing in that particular slot in order to reduce the risk of damage.

Happy slicing!

Tuesday, December 7, 2010

Flipping the Bird (or Not)

Are you sick of turkey yet?

I’m not. I didn’t cook a thing for Thanksgiving this year, nor did I have any leftovers to contend with for the following week.

Don’t get me wrong, I had a fabulous holiday. Instead of the traditional dinner at a family member’s house, we traveled to Colonial Williamsburg in Virginia and enjoyed our classic meal in a more rustic and quite memorable setting. Good food, good company, good times.

And, yet, I’m feeling somewhat deprived. By this time of year I’ve typically spent hours in the kitchen doing holiday cooking of some sort or another, but travel and other distractions have kept me largely out of the kitchen. So it’s time to take matters into my own hands, get caught up with my cooking and make myself some leftovers.

Roasting a turkey is, as you may know, a ritual that is not without its challenges. Getting the dark meat cooked through without drying out the breast can be tricky. Many articles I’ve read suggest starting the turkey breast-side down, then flipping it partway through the cooking process so the bird cooks evenly. I’ve had good results cooking my turkey in a cooking bag, using a Nesco roaster, and using a roasting plan plus foil. I also had a horrible first attempt at brining a turkey (though I haven’t given up on the idea). But my favorite way to do it is to roast a whole turkey breast—with bones and skin—and not mess with the rest. My family doesn’t like the dark meat anyway, so why bother?

You don’t even have to flip the bird with this recipe, because the moisture from the olive oil and onions keep the meat from getting dry.

This roast turkey breast is awesome for dinner but also works quite well sliced for sandwiches. And isn’t that the best way to eat turkey leftovers anyway?

One turkey breast, bone in, skin on (these are typically sold as a half breast)
One large onion (or two small onions), quartered
1 tbsp fresh or 1 tsp dried chopped sage
Two whole cloves garlic
One rib celery, cut into large chunks
½ tsp salt
¼ tsp black pepper, ground
2 tbsp olive oil

Heat oven to 350 F. Wash the turkey and pat dry. Set onto roasting rack.
Place all remaining ingredients except olive oil into a food processor and chop thoroughly. Add the olive oil while the processor is running and pulverize mix until it is a chunky, soupy paste.

Wash hands well (use gloves if desired). Work your fingers gently under the skin of the turkey to separate it and create a pocket between the skin and the meat. Spread the onion mixture throughout the pocket, covering all areas of the meat. If there are any areas where the meat is not covered by skin, cover it with the onion mixture as well.

Place turkey into the oven and roast until the skin reaches the color you prefer. Then cover it with foil and cook until the meat reaches an internal temperature of 175 degrees F. As a rule of thumb, plan for 25-30 minutes of roasting per pound of turkey.

Remove the turkey from the oven and allow to rest at least 10 minutes before carving.

Happy leftovers!

Monday, September 27, 2010

A few of my favorite things

As a food lover, I sometimes obsess over new flavors I experience. That happened to me a few weeks ago when I tried almond butter. I read an article in my husband’s Runner’s World magazine (September 2010, pg 52) that compared peanut butter, a long-time favorite fuel for athletes, to almond butter. They both have the same amount of fat, but almond butter has less saturated fat and more calcium, magnesium and vitamin E than peanut butter.

I bought Justin’s Almond Butter in the natural foods section of my grocery store, a brand I chose over the others purely based on its packaging. It was fabulous—a grainier consistency than smooth peanut butter with a wonderful roasted almond flavor. After trying a spoonful on its own, I made an almond butter & jelly sandwich and have had one for lunch most days ever since. It’s also great smeared on apples and would also taste great on a bagel.

One week later, while watching the Cooking Channel (another new favorite of mine), I saw Justin and his nut butters featured on a program called “Food Crafters.” It turns out he’s a hiking fanatic who developed these nut butters as an alternative to energy gels and created his recipes obsessively by pulling all-nighters in his small kitchen. I patted myself on the back for making such an excellent choice of almond butters my first time out. (Yes, I know, it was just the packaging.)

Not all of my food obsessions are based on random purchases at the grocery store, but all have become favorites because of a first, addiction-developing taste that connected with me from the start. Here are a few more of my favorite things that I heartily recommend trying. (NOTE: These items are here solely based on my passion for them. I have not received, asked for, or even considered any compensation for including them here.)

Pleasant Ridge Reserve cheese
This is an artisanal cheese made from Uplands Cheese Company in Dodgeville, Wisconsin, that I tried at the Kohler Food & Wine Experience several years ago. It was in a wine and cheese pairing seminar—the same one that introduced me to Moscato d’Asti wine (see my earlier blog for more info). Pleasant Ridge is made in the style of gruyere and has a smooth, slightly nutty flavor. We adore this cheese in our home, kids and parents alike. It can be hard to find—in Northeast Wisconsin, their website lists only McKnight & Carlson Wines in Appleton and Oshkosh and Nala’s Fromagerie in Green Bay (both are great places to shop, and they really know their stuff)—but well worth it.

Malbec wine
Malbec grapes grow primarily in South America, primarily in Argentina. The resulting wine is dark and full-bodied with nice spiciness. It has started to appear more frequently on wine lists but is often (and unfairly) overshadowed by the more commonly known varietals. If you like Shiraz or want a more interesting alternative to Merlot, give this a shot. My absolute favorite is Catena, and there are many other Malbecs including Felino, Crios and Alamos that can be very good as well.

Alterra Blue Heeler coffee
Like many people, my day does not begin until I have had my coffee, and it’s not uncommon to see me with a coffee mug in my hand at all times of the day. I adore the taste, the smell, the caffeine. Of the many coffee beans I have tried over the years, I have locked in on Indonesian beans as my go-to coffee. Alterra Blue Heeler is a blend of regular and dark-roasted Sumatra beans that make a bold, full-bodied brew that lacks the acidity and other sharp flavors that many other regions’ coffees exhibit. I use it for espresso, but it also makes a fine cup of regular coffee. The Alterra beans seem fresher and more flavorful than other Sumatra beans I’ve tried, so I order whole beans shipped directly to me one to two times per month. Whatever coffee you buy, PLEASE grind your own beans—it makes for a much better cup of coffee!!

I could go on for days, but frankly I’d rather hear from you on this subject so I can find even more food addictions. What are your favorite things? Let me know at pythiaeats@yahoo.com or post a comment.

Per a reader request, here are links to the products and purveyors mentioned above:

Justin’s Nut Butters: http://www.justinsnutbutter.com/
Uplands Farms (Pleasant Ridge Reserve Cheese): http://www.uplandscheese.com/
McKnight & Carlson Wine Sales: http://www.mc-wines.com/
Nala’s Fromagerie: http://www.nalascheese.com/
Catena Malbec (get from your favorite wine shop; mine is McKnight & Carlson): http://www.catenawines.com/
Alterra Coffee: http://www.alterracoffee.com/


Copyright 2010 Pythia LLC. All rights reserved.